
Programming ESP-12E / ESP-12F / NodeMCU Over Wi-Fi

|
Written by Indrek Luuk
|
The ESP-12E and ESP-12F (including the NodeMCU) are ESP8266 boards. ESP8266 is a low-cost Wi-Fi-enabled microchip that you can program over a serial or Wi-Fi connection.
Programming an ESP-12E / ESP-12F / NodeMCU over Wi-Fi is a Catch-22. You need to run an Arduino sketch capable of receiving code updates over Wi-Fi to upload your code over Wi-Fi. You can get around that by getting the USB connection working first. You can then upload a sketch running the "ArduinoOTA" library to upload code over Wi-Fi.
The first thing to do is to prepare your Arduino IDE for the ESP8266 microcontroller and establish a USB connection.

|
My article about programming the ESP-12E / ESP-12F / NodeMCU with Arduino IDE over USB connection: |
The rest of this article assumes that you have already prepared your Arduino IDE and can upload your Arduino sketch to your ESP-12E / ESP-12F / NodeMCU over the USB serial connection.
We will use the "ArduinoOTA" library, but you don't have to install anything extra since it is already included with the ESP8266 platform package.
I have prepared two Arduino sketches:
- 1. Minimal Arduino Code to Upload a Sketch Over Wi-Fi
- 2. Arduino OTA Programming With Configurable Wi-Fi
Required components:


Disclosure: Bear in mind that some of the links in this post are affiliate links and if you go through them to make a purchase I will earn a commission. Keep in mind that I link these companies and their products because of their quality and not because of the commission I receive from your purchases. The decision is yours, and whether or not you decide to buy something is completely up to you.
Video tutorial:
1. Minimal Arduino Code to Upload a Sketch Over Wi-Fi
Change the "wifi_ssid" and "wifi_password" to your Wi-Fi name and password.
#include <ESP8266WiFi.h>
#include <ArduinoOTA.h>
// Wi-Fi connection parameters
const char * wifi_ssid = "YourWifiName";
const char * wifi_password = "YourWifiPassword";
void setup() {
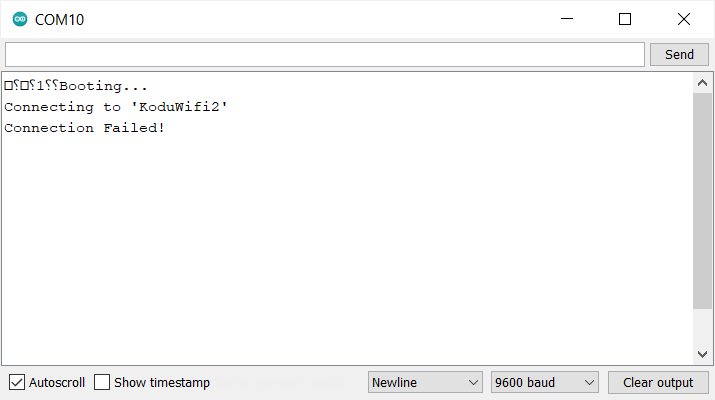
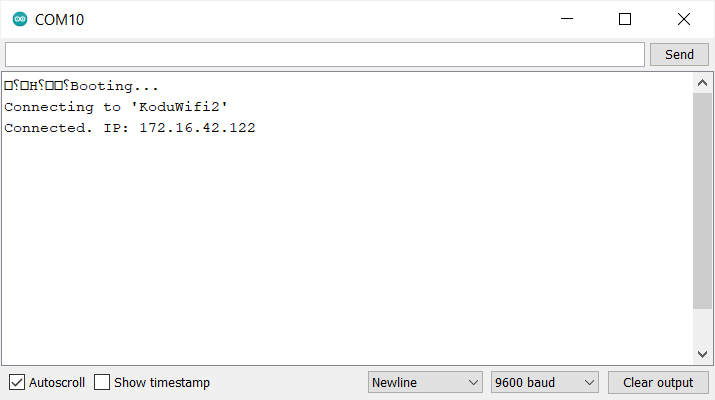
Serial.begin(9600);
Serial.println("Booting...");
connectToWiFi();
setUpOverTheAirProgramming();
}
void connectToWiFi() {
Serial.printf("Connecting to '%s'\n", wifi_ssid);
WiFi.mode(WIFI_STA);
WiFi.begin(wifi_ssid, wifi_password);
if (WiFi.waitForConnectResult() == WL_CONNECTED) {
Serial.print("Connected. IP: ");
Serial.println(WiFi.localIP());
} else {
Serial.println("Connection Failed!");
}
}
void setUpOverTheAirProgramming() {
// Change OTA port.
// Default: 8266
// ArduinoOTA.setPort(8266);
// Change the name of how it is going to
// show up in Arduino IDE.
// Default: esp8266-[ChipID]
// ArduinoOTA.setHostname("myesp8266");
// Re-programming passowrd.
// No password by default.
// ArduinoOTA.setPassword("123");
ArduinoOTA.begin();
}
void loop() {
// Give processing time for ArduinoOTA
ArduinoOTA.handle();
}
After you have successfully uploaded the above sketch to the ESP module with the correct Wi-Fi name and password, your device should show up in the Arduino IDE "Port" menu.

Now you should be able to click the "Upload" button, and your sketch should upload to the ESP module over the Wi-Fi network.
Troubleshooting
If you can't see the networking port under the "Port" menu, try restarting your Arduino IDE and wait a couple of seconds.
If it still doesn't show up, then connect to the module with a USB cable and open the Arduino terminal. If it says "Connection Failed!" then check your Wi-Fi name and password.
If the connection is successful, and you can see the IP address in the Arduino terminal window, and the ESP8266 network port still doesn't show up in Arduino IDE, then make sure you have connected your computer to the same Wi-Fi network.
2. Arduino OTA Programming With Configurable Wi-Fi
One big problem with over Wi-Fi programming is that if your module fails to connect (maybe your Wi-Fi password has changed), then the only way to re-program it is to make the USB connection again.
To alleviate this issue, we can make the ESP module set itself up as an access point if it fails to connect to our existing Wi-Fi network. Then we can connect our computer to the access point.
Unfortunately, the "ArduinoOTA" library doesn't work with the soft access point that the "ESP8266WiFi" library creates. The upload progresses up to about 15% and then fails.
The workaround is to make the Wi-Fi credentials to be configurable from the browser.
- If joining our existing network fails, the module will create its own access point.
- We can connect our computer directly to the module's access point.
- We can open a browser window and re-configure the Wi-Fi name and password.
- The ESP module will connect to the configured Wi-Fi network.
- Now we can use the "ArduinoOTA" library to re-program the device over Wi-Fi.
#include <EEPROM.h>
#include <ESP8266WiFi.h>
#include <ESP8266WebServer.h>
#include <ArduinoOTA.h>

// Configuration for fallback access point
// if Wi-Fi connection fails.
const char * AP_ssid = "ESP8266_fallback_AP";
const char * AP_password = "SuperSecretPassword";
IPAddress AP_IP = IPAddress(10,1,1,1);
IPAddress AP_subnet = IPAddress(255,255,255,0);

// Wi-Fi connection parameters.
// It will be read from the flash during setup.
struct WifiConf {
  char wifi_ssid[50];
  char wifi_password[50];
  // Make sure that there is a 0
  // that terminatnes the c string
  // if memory is not initalized yet.
  char cstr_terminator = 0; // makse sure
};
WifiConf wifiConf;

// Web server for editing configuration.
// 80 is the default http port.
ESP8266WebServer server(80);


void setup() {
  Serial.begin(9600);
  Serial.println("Booting...");

  // init EEPROM object
  // to read/write wifi configuration.
  EEPROM.begin(512);
  readWifiConf();

  if (!connectToWiFi()) {
    setUpAccessPoint();
  }
  setUpWebServer();
  setUpOverTheAirProgramming();
}

void readWifiConf() {
  // Read wifi conf from flash
  for (int i=0; i<sizeof(wifiConf); i++) {
    ((char *)(&wifiConf))[i] = char(EEPROM.read(i));
  }
  // Make sure that there is a 0
  // that terminatnes the c string
  // if memory is not initalized yet.
  wifiConf.cstr_terminator = 0;
}


void writeWifiConf() {
  for (int i=0; i<sizeof(wifiConf); i++) {
    EEPROM.write(i, ((char *)(&wifiConf))[i]);
  }
  EEPROM.commit();
}

bool connectToWiFi() {
  Serial.printf("Connecting to '%s'\n", wifiConf.wifi_ssid);

  WiFi.mode(WIFI_STA);
  WiFi.begin(wifiConf.wifi_ssid, wifiConf.wifi_password);
  if (WiFi.waitForConnectResult() == WL_CONNECTED) {
    Serial.print("Connected. IP: ");
    Serial.println(WiFi.localIP());
    return true;
  } else {
    Serial.println("Connection Failed!");
    return false;
  }
}

void setUpAccessPoint() {
    Serial.println("Setting up access point.");
    Serial.printf("SSID: %s\n", AP_ssid);
    Serial.printf("Password: %s\n", AP_password);

    WiFi.mode(WIFI_AP_STA);
    WiFi.softAPConfig(AP_IP, AP_IP, AP_subnet);
    if (WiFi.softAP(AP_ssid, AP_password)) {
      Serial.print("Ready. Access point IP: ");
      Serial.println(WiFi.softAPIP());
    } else {
      Serial.println("Setting up access point failed!");
    }
}

void setUpWebServer() {
  server.on("/", handleWebServerRequest);
  server.begin();
}

void handleWebServerRequest() {
  bool save = false;

  if (server.hasArg("ssid") && server.hasArg("password")) {
    server.arg("ssid").toCharArray(
      wifiConf.wifi_ssid,
      sizeof(wifiConf.wifi_ssid));
    server.arg("password").toCharArray(
      wifiConf.wifi_password,
      sizeof(wifiConf.wifi_password));

    Serial.println(server.arg("ssid"));
    Serial.println(wifiConf.wifi_ssid);

    writeWifiConf();
    save = true;
  }

  String message = "";
  message += "<!DOCTYPE html>";
  message += "<html>";
  message += "<head>";
  message += "<title>ESP8266 conf</title>";
  message += "</head>";
  message += "<body>";
  if (save) {
    message += "<div>Saved! Rebooting...</div>";
  } else {
    message += "<h1>Wi-Fi conf</h1>";
    message += "<form action='/' method='POST'>";
    message += "<div>SSID:</div>";
    message += "<div><input type='text' name='ssid' value='" + String(wifiConf.wifi_ssid) + "'/></div>";
    message += "<div>Password:</div>";
    message += "<div><input type='password' name='password' value='" + String(wifiConf.wifi_password) + "'/></div>";
    message += "<div><input type='submit' value='Save'/></div>";
    message += "</form>";
  }
  message += "</body>";
  message += "</html>";
  server.send(200, "text/html", message);

  if (save) {
    Serial.println("Wi-Fi conf saved. Rebooting...");
    delay(1000);
    ESP.restart();
  }
}

void setUpOverTheAirProgramming() {

  // Change OTA port.
  // Default: 8266
  // ArduinoOTA.setPort(8266);

  // Change the name of how it is going to
  // show up in Arduino IDE.
  // Default: esp8266-[ChipID]
  // ArduinoOTA.setHostname("myesp8266");

  // Re-programming passowrd.
  // No password by default.
  // ArduinoOTA.setPassword("123");

  ArduinoOTA.begin();
}


void loop() {
  // Give processing time for ArduinoOTA.
  // This must be called regularly
  // for the Over-The-Air upload to work.
  ArduinoOTA.handle();

  // Give processing time for the webserver.
  // This must be called regularly
  // for the webserver to work.
  server.handleClient();
}
After uploading the above sketch to the ESP module, open the terminal window, and reset the device. You should see that connecting to Wi-Fi failed, and the access point has been created.
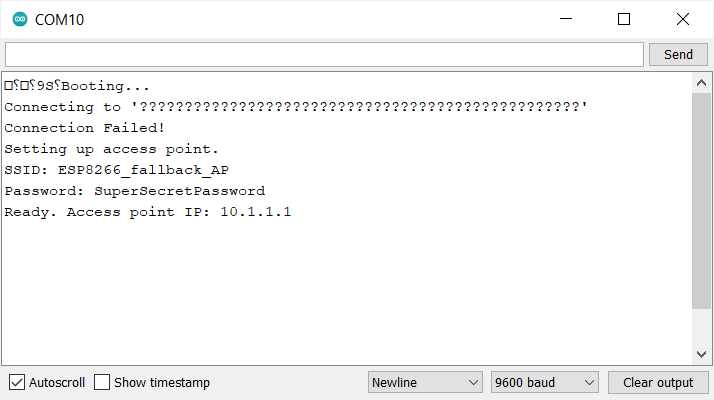
This is normal since the Wi-Fi access is not configured yet. The network name will show up as question marks or some random jumble since, initially, the flash of the ESP8266 is filled with garbage.
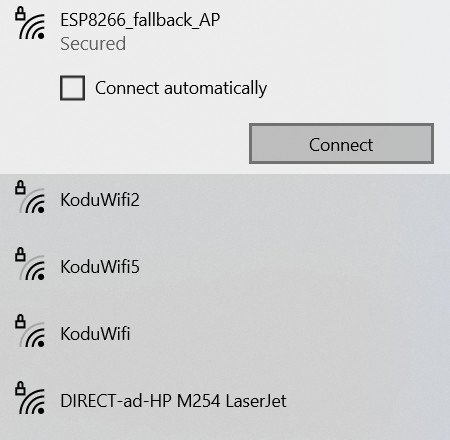
We need to connect to the access point to enter the proper Wi-Fi credentials for our local network.
The "ESP8266_fallback_AP" option should appear in the Wi-Fi network list. If you didn't change the access point password, it would be "SuperSecretPassword".
After connecting to the "ESP8266_fallback_AP," open a web browser and type 10.1.1.1 into the address bar. You should see the following configuration page.
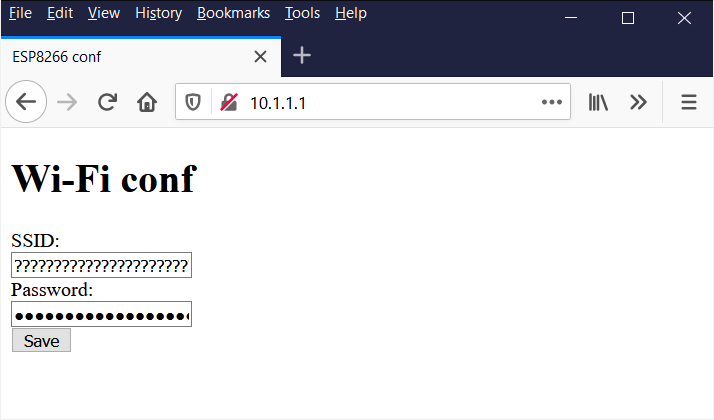
Enter your Wi-Fi name and password.
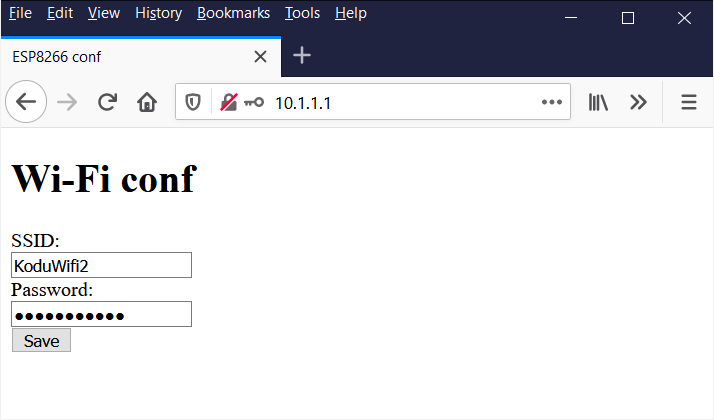
And click save.
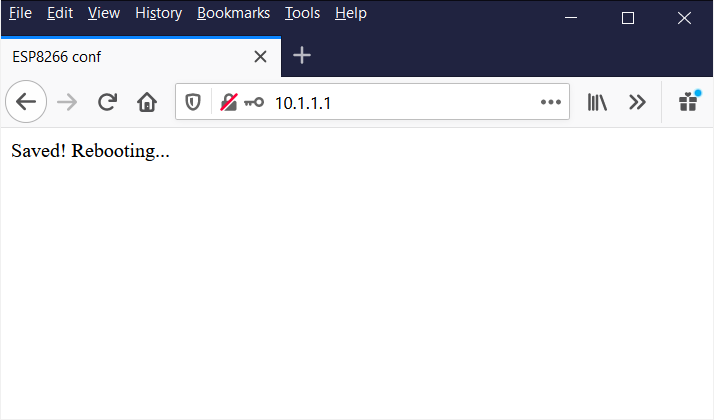
Connect your computer to the same Wi-Fi network you entered into the configuration page and open Arduino IDE. The ESP8266 should show up in the "Port" menu.
Now you should be able to click the "Upload" button, and your sketch should upload to the ESP module over the Wi-Fi network.

