50kg Load Cells with HX711 and Arduino. 4x, 2x, 1x Diagrams.

|
Written by Indrek Luuk
|

Table of content:
- Required Components.
- Video Tutorial.
- Verify Your Load Cell Wires.
- Using Four Load Cells in a Single Circuit. 4 x 50kg (200 kg / 440 lbs).
- Using Two Load Cells in a Single Circuit. 2 x 50kg (100 kg / 220 lbs).
- Using a Single Load Cell. 1 x 50kg (110 lbs).
- Mounting the 50kg Bathroom Scale Module to a Wooden Board.
- Arduino Code to Read Weight Value from the HX711 Module.

https://circuitjournal.com/four-wire-load-cell-with-HX711
You can buy relatively cheap bathroom scale load cells from China. Each cell is rated for 50 kg / 110 lbs. They can safely handle 120% overload (60 kg / 130 lbs per cell) and the ultimate overload of 150% (75 kg / 165 lbs per cell). Going over the maximum limit can permanently damage the load cells.
If you combine four cells to a single scale, then you can measures up to 4 x 50 = 200 kg / 440 lbs.

This more-or-less matches my experience with it in short term measurements. The reading of the scale roughly varies plus/minus ten grams while the scale sits still.
But it tends to drift over time slowly. If you leave it overnight, you may see that the value has changed considerably (even ±1 kg).
Here is an example of an iPhone 5 (113g) on my home-made scale:

It takes some time for the level to settle back to zero after having a little heavier weight on it. For example, if I step off the scale, it goes quickly back to about 50g. Then it takes some additional time to reach back to zero again.
Required Components.


Disclosure: Bear in mind that some of the links in this post are affiliate links and if you go through them to make a purchase I will earn a commission. Keep in mind that I link these companies and their products because of their quality and not because of the commission I receive from your purchases. The decision is yours, and whether or not you decide to buy something is completely up to you.
Video Tutorial.
A step-by-step guide in video form. Here I will go over all three connection diagrams: four-cell circuit, two-cell circuit, and a single cell circuit.
This video is a detailed explanation of how to mount the bathroom scale load cell to a wooden board.
Verify Your Load Cell Wires.
Before connecting the load cells to the HX711 amplifier module, you should verify the wires. There should be three wires coming out of them.
I have white, red, and black:

The important part is to identify the middle wire. You can do it with a simple multimeter.
The resistance value between the outer wires is double the resistance between the middle wire and the outer wires. In my case, the resistance between the white and black wires is 2k, and between white and red or black and red is 1k.
If you also have white, red, and black wires, then you most likely have the same configuration as I, but there are no guarantees.
It is not necessary to know which wire is for positive or negative strain. But all the load cells must be the same.
Using Four Load Cells in a Single Circuit.
4 x 50kg (200 kg / 440 lbs).
You can connect four cells to a loop that forms a single scale unit:
1. Form a loop by linking the same color outer wires (white and black) of the four load cells.
Validate the wiring by measuring the resistance of both diagonals (red wires). Both of them should be around 2k ohms.
2. Connect the middle cable (red) of one of the diagonals to the E+ and E- outputs of the HX711 module.
E+ and E- are the power wires for the cells. The polarity doesn't matter. Switching will only invert the calibration parameter in the software.
3. Connect the other diagonal to the A+ and A- inputs of the HX711 module.
A+ and A- are the measurement inputs from the cells. Like with the power wires, the polarity is not important.
4. Connect the GND of the HX711 module to the Arduino GND and VCC to the Arduino 5V pin.
HX711 also works with 3.3V. So if you have some other microcontroller that runs on 3.3V, then you can use 3.3V instead of 5V.
6. Connect the DT and SCK of the HX711 module to any of the Arduino digital IO pins.
In the schematic, I used pins 4 and 5, since those are the default pins for the examples of the "HX711_ADC" library.
If you want to use interrupts to update scale data, then you should connect the DT output to an interrupt enabled pin of the Arduino. For Uno/Nano, those are pins 2 and 3.
Using Two Load Cells in a Single Circuit.
2 x 50kg (100 kg / 220 lbs).
You can connect two cells side-by-side to forms a single scale unit:

1. Connect the opposite sides of the outer wires (white and black) of the two load cells.
Validate your wiring by measuring the resistance between the two connection points of the white-back wires pairs. It should be about 1k ohm.
Then measure the resistance between the two red wires. It should also be about 1k ohm
2. Connect the outer wire pairs to E+ and E- output of the HX711 module.
One white-black pair goes to the E+ and the other black-white pair to the E-.
E+ and E- are the power wires for the cells. The polarity doesn't matter. Switching will only invert the calibration parameter in the software.
3. Connect the middle wires (red) of the load cells to the A+ and A- inputs of the HX711 module.
A+ and A- are the measurement inputs from the cells. Like with the power wires, the polarity is not important.
4. Connect the GND of the HX711 module to the Arduino GND and VCC to the Arduino 5V pin.
HX711 also works with 3.3V. So if you have some other microcontroller that runs on 3.3V, then you can use 3.3V instead of 5V.
6. Connect the DT and SCK of the HX711 module to any of the Arduino digital IO pins.
In the schematic, I used pins 4 and 5, since those are the default pins for the examples of the "HX711_ADC" library.
If you want to use interrupts to update scale data, then you should connect the DT output to an interrupt enabled pin of the Arduino. For Uno/Nano, those are pins 2 and 3.
Using a Single Load Cell.
1 x 50kg (110 lbs).

1. Connect the outer wires (white and black) of the load cell to the E+ and E- outputs of the HX711 module.
E+ and E- are the power wires for the cells. The polarity doesn't matter. Switching will only invert the calibration parameter in the software.
2. Connect the middle cable (red) of the load cell to the A+ input of the HX711 module.
3. Connect two 1k resistors to the A- input of the HX711 module. Then the other ends of the resistors to the white and black wires.
A+ and A- are the measurement inputs from the cells. Like with the power wires, the polarity is not important. You may as well connect the red cable to A- and the resistors to A+.
4. Connect the GND of the HX711 module to the Arduino GND and VCC to the Arduino 5V pin.
HX711 also works with 3.3V. So if you have some other microcontroller that runs on 3.3V, then you can use 3.3V instead of 5V.
6. Connect the DT and SCK of the HX711 module to any of the Arduino digital IO pins.
In the schematic, I used pins 4 and 5, since those are the default pins for the examples of the "HX711_ADC" library.
If you want to use interrupts to update scale data, then you should connect the DT output to an interrupt enabled pin of the Arduino. For Uno/Nano, those are pins 2 and 3.
Mounting the 50kg Bathroom Scale Module to a Wooden Board.
If you look at the load cell, you can see that it has an inner square and an outer square.
You must attach it to your board in a way that allows the inner part to flex relative to the rest of the unit. This means you have to add a spacer between the board and the outer rim of the load cell.

The easiest way to mount them to a wooden board it to 3D print a mounting frame.
This is how the frame looks like printed out. It has two parts. The load cell is squeezed between the outer shell and the spacer ring:

The load cell mounted to a wooden board:

The four load cell circuit mounted under a wooden board:

Arduino Code to Read Weight Value from the HX711 Module.
Click on the green "Clone or download" button and then "Download ZIP."
Extract the downloaded ZIP file and move it into your Arduino "libraries" folder.
C:\Users\<username>\Documents\Arduino\libraries
/Users/<username>/Documents/Arduino/libraries
2. Open the Calibration example that came with the "HX711_ADC" library.
3. Load the example code to your Arduino.
It should work without any modifications if you connected the DT output of the HX711 module to the Arduino pin 4, and SCK to the Arduino pin 5.
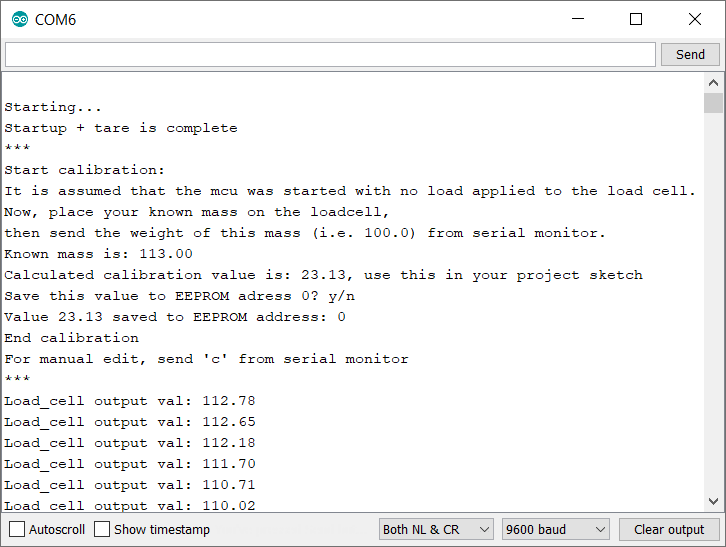
3. Open the Arduino Serial Monitor.
Follow the directions in the terminal window. It asks you to put a known mass onto the load cells and then enter the weight of that item. This process calibrates your scale.
Then it starts outputting the current weight value on the scale.