
Wiring DFPlayer Mini (MP3 Module) to Arduino. Stereo/Mono Diagrams.

|
Written by Indrek Luuk
|
Table of content:
- Required Components
- Video Tutorial
- Wiring Diagram: mono
- Wiring Diagram: stereo
- Choosing a Speaker
- Arduino Code
- Preparing Your SD Card
- Naming MP3 Files and Folders
DFPlayer Mini is a cheap MP3 player module with a Micro SD card slot.

To use the DFPlayer Mini module with Arduino, you only need to connect four wires - VCC and GND to give power to the module and two Arduino digital pins to the RX and TX pins for serial communication. Then you can send commands to play MP3 files on the SD card.
You can connect one mono speaker to the module or headphones in stereo mode.

Required Components
- A Micro SD card


Disclosure: Bear in mind that some of the links in this post are affiliate links and if you go through them to make a purchase I will earn a commission. Keep in mind that I link these companies and their products because of their quality and not because of the commission I receive from your purchases. The decision is yours, and whether or not you decide to buy something is completely up to you.
Video Tutorial
This is a step-by-step guide in video form. Here I am using Arduino Nano instead of Uno, but the pins are the same.
It's a revised version of my previous DFPlayer Mini video, where I connected the Arduino serial output pin directly to the DFPlayer Mini board's RX pin. This shouldn't be done since the input pins of the module are not 5V tolerant. In this video, I am using a voltage divider for the RX pin.
Wiring Diagram: mono
1. You can connect the 5V output from Arduino to the VCC pin of the MP3 player module. It is 5V tolerant.
It is possible to power DFPlayer Mini with 3.3V, but in my experience, the 3.3V voltage regulator on the Arduino board could not deliver enough current for it to work reliably.
2. Connect Arduino GND to the GND pin of the board.
3. Make a voltage divider between Arduino D2 (software serial data transmit) pin and module's RX (data receive) pin.
DFPlayer Mini's digital input pins are not 5V tolerant. You should create a voltage divider by connecting a 680Ω and a 1kΩ in series from Arduino D2 to GND. Then connect a wire from between the resistors to the module's RX pin.
4. Connect Arduino D3 (software serial data receive) pin to the module's TX (data transmit) pin.
5. For a mono speaker, connect one wire to SPK1 and the other to SPK2.
Wiring Diagram: stereo

1. You can connect the 5V output from Arduino to the VCC pin of the MP3 player module. It is 5V tolerant.
It is possible to power DFPlayer Mini with 3.3V, but in my experience, the 3.3V voltage regulator on the Arduino board could not deliver enough current for it to work reliably.
2. Connect Arduino GND to the GND pin of the board.
3. Make a voltage divider between Arduino D2 (software serial data transmit) pin and module's RX (data receive) pin.
DFPlayer Mini's digital input pins are not 5V tolerant. You should create a voltage divider by connecting a 680Ω and a 1kΩ in series from Arduino D2 to GND. Then connect a wire from between the resistors to the module's RX pin.
4. Connect Arduino D3 (software serial data receive) pin to the module's TX (data transmit) pin.
5. For stereo headphones, connect the headphone jack's GND to the module's GND pin. Wire for the left ear goes to DACL and wire for the right ear to DACR.
Choosing a Speaker
DFPlayer Mini has a 3W amplifier on the board. You can try it with any speaker that has 4Ω or more impedance. The lower the impedance, the louder the maximum volume can be. I have mostly used cheap 8Ω speakers off of eBay, although once I tried it with an old rotary phone's handset.
Here is an example of the 8Ω speaker in action:
I don't know the old phone's speaker's actual impedance value, but it was probably higher than 8Ω. It was pretty quiet but about right for a phone's handset.
Here is an example of the phone's speaker:
Arduino Code
The easiest way to control DFPlayer Mini is to use the "DFRobotDFPlayerMini" library: https://github.com/DFRobot/DFRobotDFPlayerMiniClick on the green "Clone or download" button and then "Download ZIP."
Extract the downloaded ZIP file and move it into your Arduino "libraries" folder.
C:\Users\<username>\Documents\Arduino\libraries
/Users/<username>/Documents/Arduino/libraries
This is a simple example that starts playing the first MP3 file on the SD card after Arduino start up:
#include "SoftwareSerial.h"
#include "DFRobotDFPlayerMini.h"

// Use pins 2 and 3 to communicate with DFPlayer Mini
static const uint8_t PIN_MP3_TX = 2; // Connects to module's RX
static const uint8_t PIN_MP3_RX = 3; // Connects to module's TX
SoftwareSerial softwareSerial(PIN_MP3_RX, PIN_MP3_TX);

// Create the Player object
DFRobotDFPlayerMini player;

void setup() {
  // Init USB serial port for debugging
  Serial.begin(9600);
  // Init serial port for DFPlayer Mini
  softwareSerial.begin(9600);

  // Start communication with DFPlayer Mini
  if (player.begin(softwareSerial)) {
    Serial.println("OK");

    // Set volume to maximum (0 to 30).
    player.volume(30);
    // Play the "0001.mp3" in the "mp3" folder on the SD card
    player.playMp3Folder(1);

  } else {
    Serial.println("Connecting to DFPlayer Mini failed!");
  }
}

void loop() {
}
As a next step, you can follow the examples that come with the "DFRobotDFPlayerMini" library. It has commands to start and stop a song, play the next song in the sequence, play a song in a loop, etc.
Preparing Your SD Card
You need to format your SD card to FAT or FAT32.
- Right-click on the SD card drive -> "Format..."
- Select the file system as "FAT32 (Default)"
- Click on the "Start" button

- Open "Disk Utility"
- Select your SD card
- Click on the "Erase" button on the toolbar
- Select the format as "MS-DOS (FAT)"
- Click on the "Erase" button

Naming MP3 Files and Folders
The DFPlayer Mini module can't access the MP3 files directly by file name. Instead, it uses file numbers. There are a few different ways to store your MP3 files on the SD card to be directly playable from the Arduino code.
The "DFRobotDFPlayerMini" library has special methods depending on how and where the files are stored.
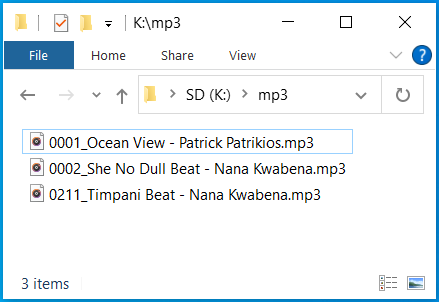
1. The "mp3" Folder
You can create a folder named "mp3" onto the root of your SD card. These files can be played by calling the "playMp3Folder" function.
player.playMp3Folder(int fileNumber);
The parameter "fileNumber" is the first four digits in the file name.
This means that all the files inside the "mp3" folder should look like "nnnnXXX.mp3". Where "nnnn" is a number between 0001 and 9999, and "XXX" can be anything you like.
These files can be played by calling:
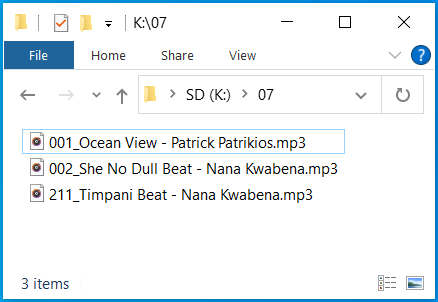
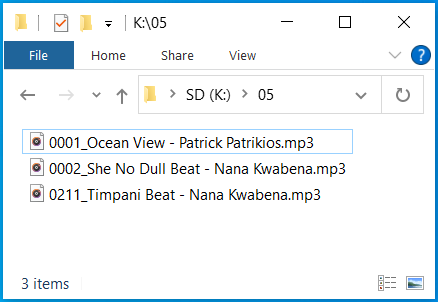
2. A Numeric Folder ("01", "02", "03", ...)
Your second option is to put your mp3 files into a two-digit numeric folder. Depending on the file name, the files can be played with "playFolder" or "playLargeFolder".
player.playFolder(uint8_t folderNumber, uint8_t fileNumber);
In the case of "playFolder", the file number has to start with a three-digit number and should look like "nnnXXX.mp3". Where "nnn" is a number between 001 and 999, and "XXX" can be anything you like.
These files can be played by calling:
player.playLargeFolder(uint8_t folderNumber, uint16_t fileNumber);
If you need to have more than a thousand mp3 files in a folder, you can use the "playLargeFolder" function. In that case, the file number has to start with a four-digit number and should look like "nnnnXXX.mp3". Where "nnnn" is a number between 0001 and 9999, and "XXX" can be anything you like.
These files can be played by calling:
3. Any File Anywhere on the SD Card
The "play" function will play any mp3 file on the SD card. It doesn't matter if it is inside a folder or not.
player.play(int fileNumber);
The number of a file is determined by the order that it is copied to the SD card. Renaming files that are already copied to the SD card will not change the file number.
Also, hidden files created by the operating system will have their own file number. This means that you may see three files on the SD card and call "player.play(2)", but nothing will play since there is a hidden non-playable file on the SD card.
IMPORTANT FOR MAC USERS!
Your Operating System creates hidden files on the SD card
that WILL mess up the file numbers for the "play" function.
dot_clean /Volumes/<SD Card Name>
This command will remove all the hidden "._<your file name>.mp3" files created by the OS.

